
For an awesome pizza, you need an awesome pizza oven. This article covers everything you need to know from building a proper base to a step by step guide for laying bricks the easiest way possible to build a durable, high-performance wood fired pizza oven in your back yard. You’ll also learn optional but simple extra features you can implement to make the pizza furnace even more awesome.
You are welcome to read the article from top to bottom or use the following table of contents to navigate to the topic of interest straight away:
Table of contents:
1. Why even build an outdoor, wood fired pizza oven?
2. What materials, tools and skills do you need to build a DIY brick pizza oven?
2.1. Total summary of materials and tools required to build a pizza oven
2.2. What kind of bricks are suitable for building a pizza oven?
3. How to build a base for your outdoor DIY wood fired pizza oven? Here are three easy ways.
3.1. Old bricks, gravel or sand: easy but bad ergonomics
3.2. Construction blocks: very easy and better ergonomic
3.3. Poured concrete under construction blocks: the most recommended option (especially for winter)
4. How to construct a pizza oven from bricks and slabs the easiest way possible? A step by step guide.
5. How to properly use your outdoor pizza oven to get restaurant quality, Neapolitan style pizza?
6. A couple of pro tips for using the pizza oven
Why even build an outdoor, wood fired pizza oven?
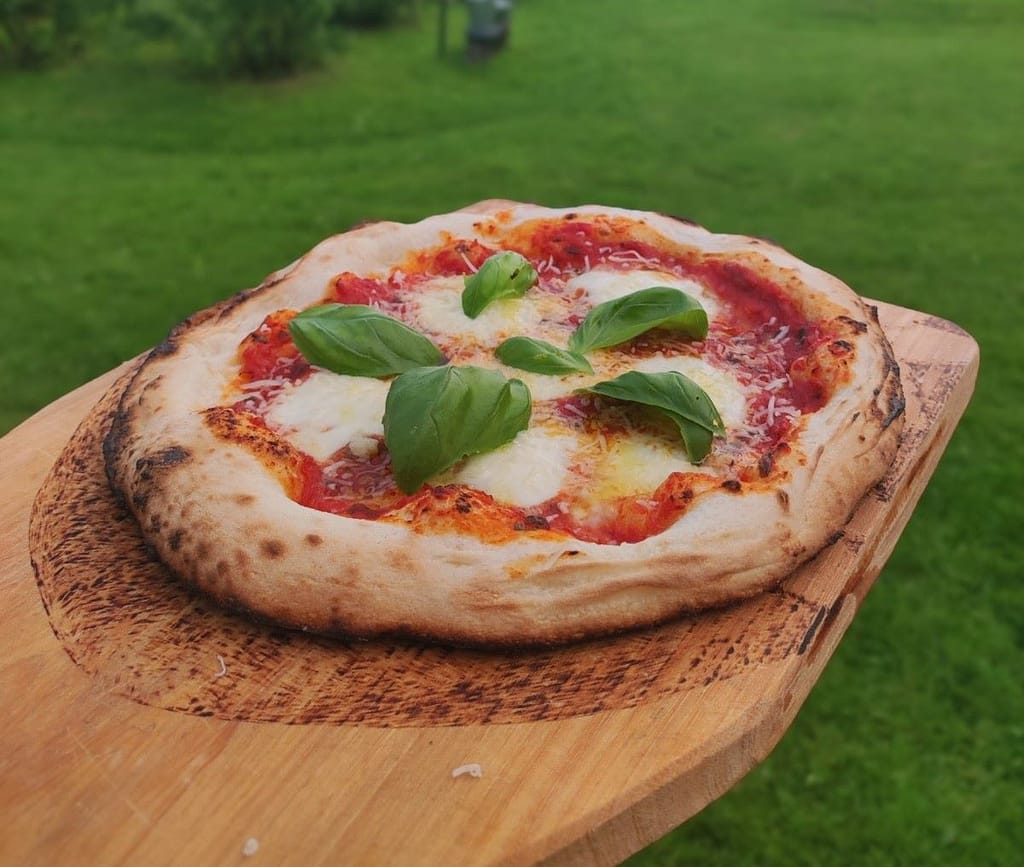
Pizza – we all love it (some more than others). Having the capability and skill to make your own crunchy, fluffy, tasty, restaurant quality pizza is definitely worth it! Just thinking about it makes me want to fire up the ol’ oven and watch a pizza cook. It’s fun to see the dough rise with such speed. The pie will be done in under 2 minutes. Then you shovel it out with your pizza peel and onto the cutting board. You hear a satisfying crunch when slicing it up with a cutter. Then you take the first bite… heaven!
This will definitely be a hit whenever you bring some friends over. You can even host a small pizza festival in your backyard. I did, after a good friend told me I had to, after I sent him some pictures of the oven and pizzas. We gathered a bunch of friends, made lots of pizzas, cracked open some bottles of wine… fun times.
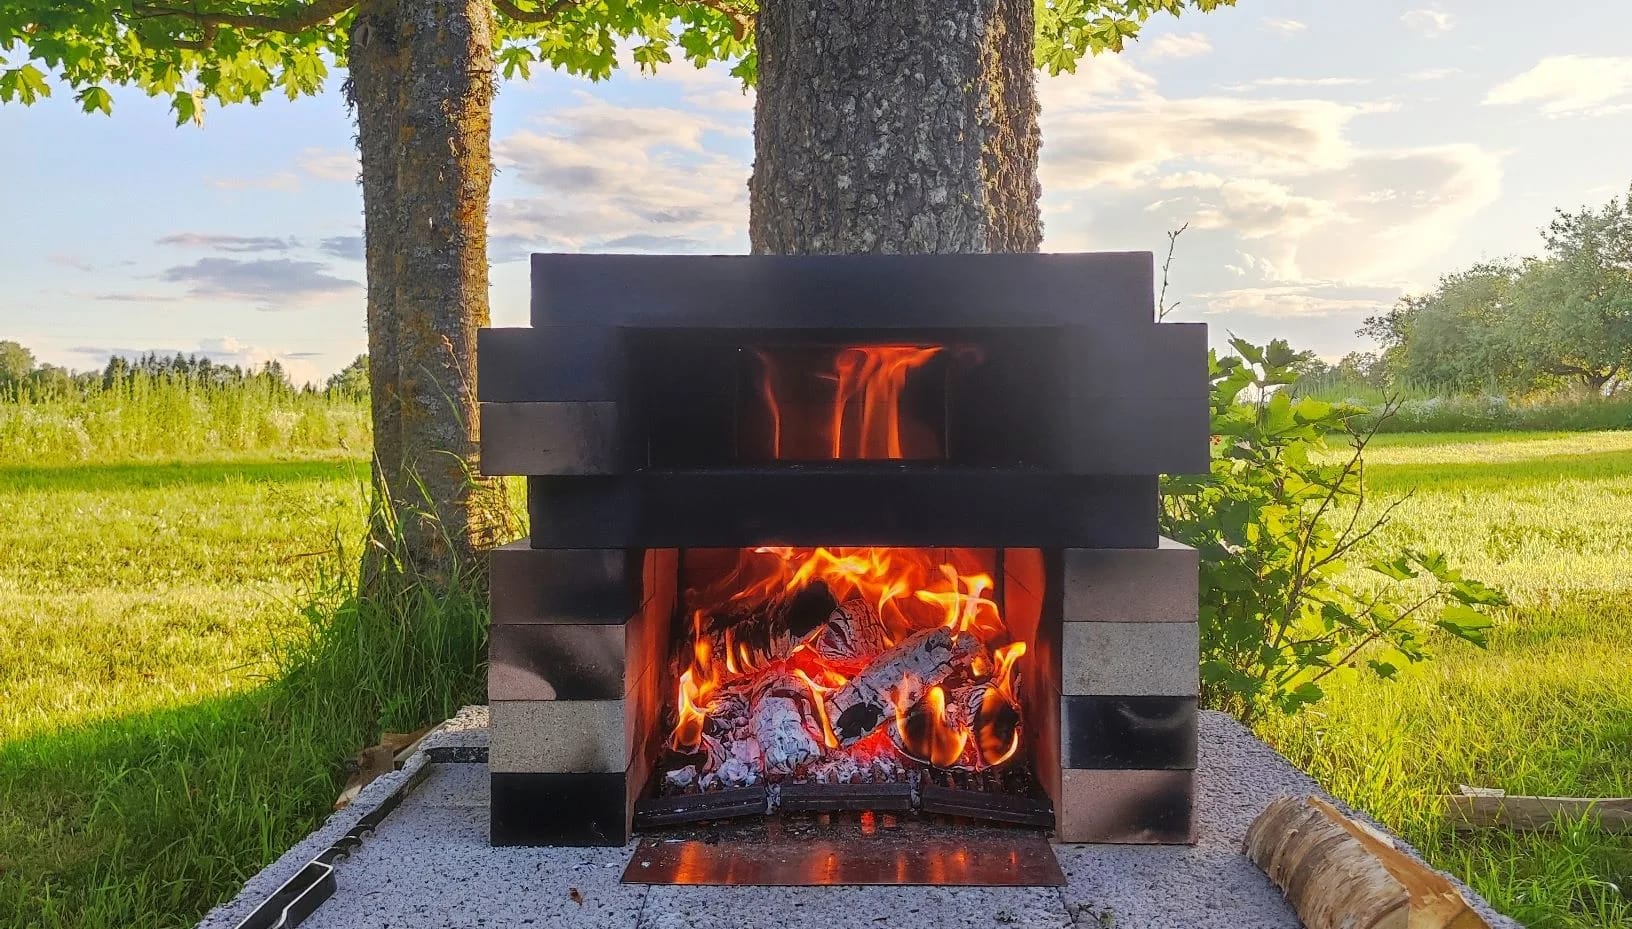
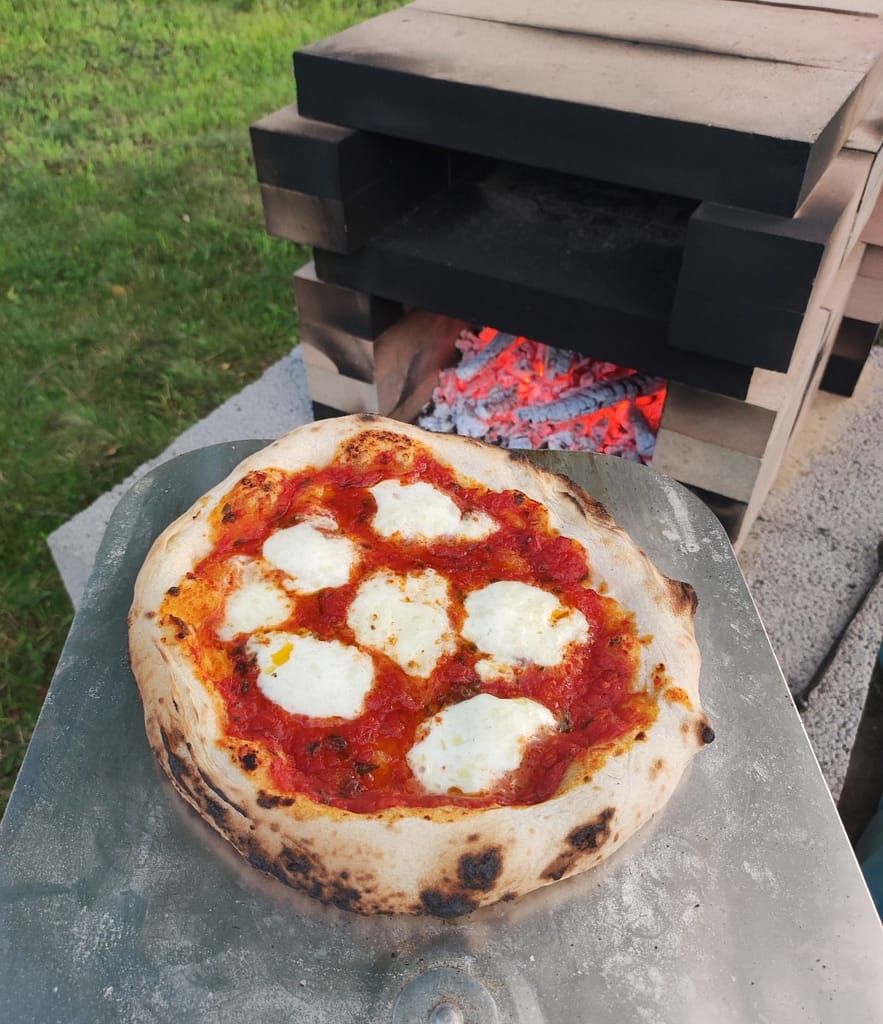
In order to cook such a pizza that makes the world a better place and brings so much joy, you need an outdoor oven with live fire. An oven like that can raise the temperature above 800 degrees Fahrenheit or 400 degrees Celsius. This is the temperature required to make Neapolitan style pizzas that cook under 2 minutes, are crunchy, yet fluffy and oh so delicious.
You can easily build your own wood fired pizza oven. In this blog post I will show you how (just keep reading to learn how).
For now, here are some reasons to build your own pizza oven:
- Pizza that comes out of a wood fired oven is soooo good. Enough said.
- You get a good outdoor surface to put stuff on
- A well built pizza oven looks cool
- You can cook other things there too: stakes, veggies, cakes and so on
- You get an outdoor fireplace that people will want to sit around
- It’s very easy to build
- You don’t need to clean it if you make a mess because fire will turn everything into ash
So… let’s get to it. Read on to find out how to make the ultimate, easy-to-build, no construction skills required, DIY wood fired pizza oven.
What materials, tools and skills do you need to build a DIY brick pizza oven?
First and foremost. What skills are needed? None. Seriously. This DIY pizza oven is so easy to build that even a toddler could do it (if he/she had the strength to lift a brick). This is because I am a very lazy person and tried to shortcut as much as possible. The aim was to make it as simple as possible because I lack construction skills. My goals were simple: super easy to build, safe, long-lasting and high-performance. The end goal has always been to make really awesome pizzas and not the building process itself.
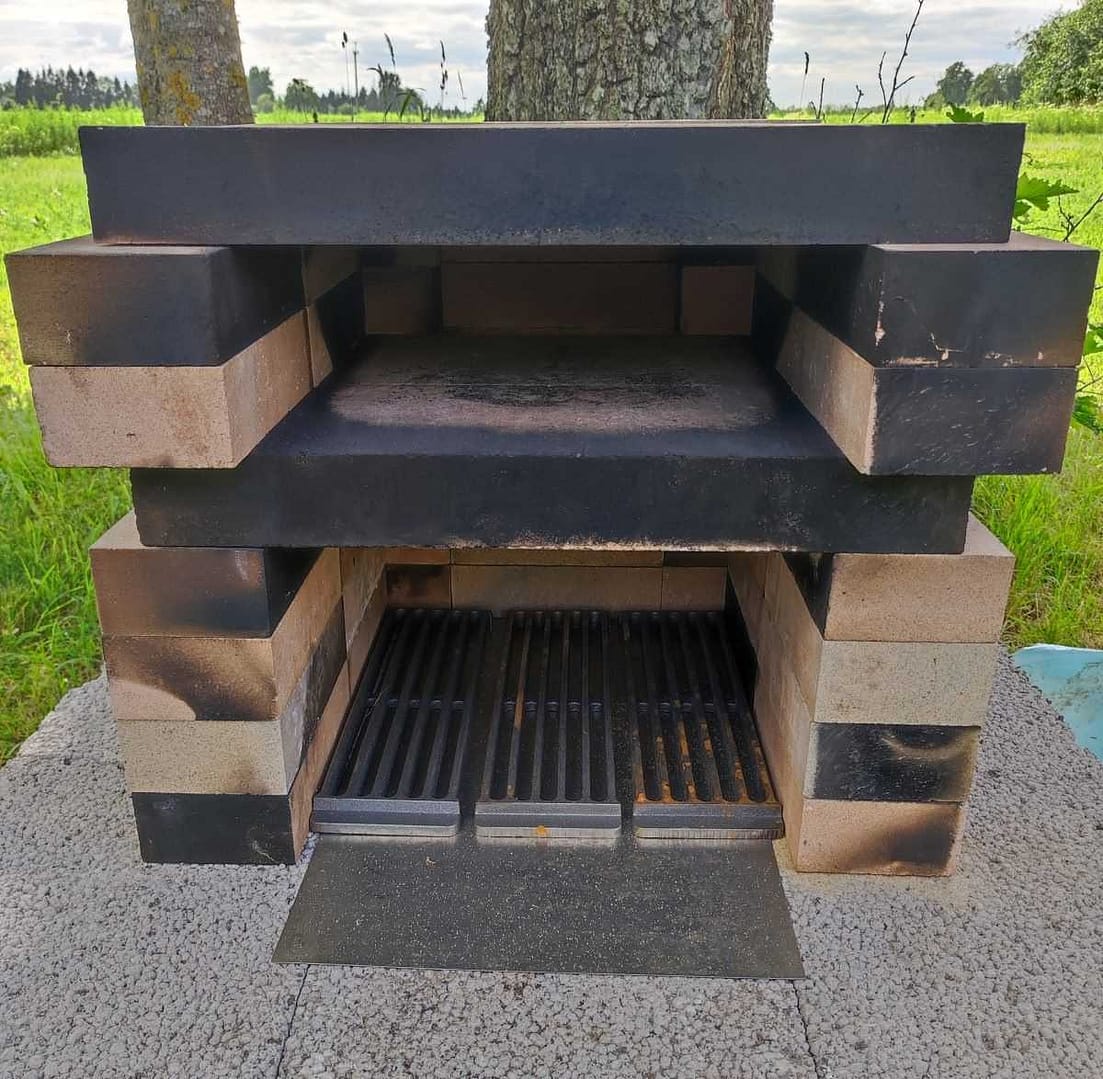
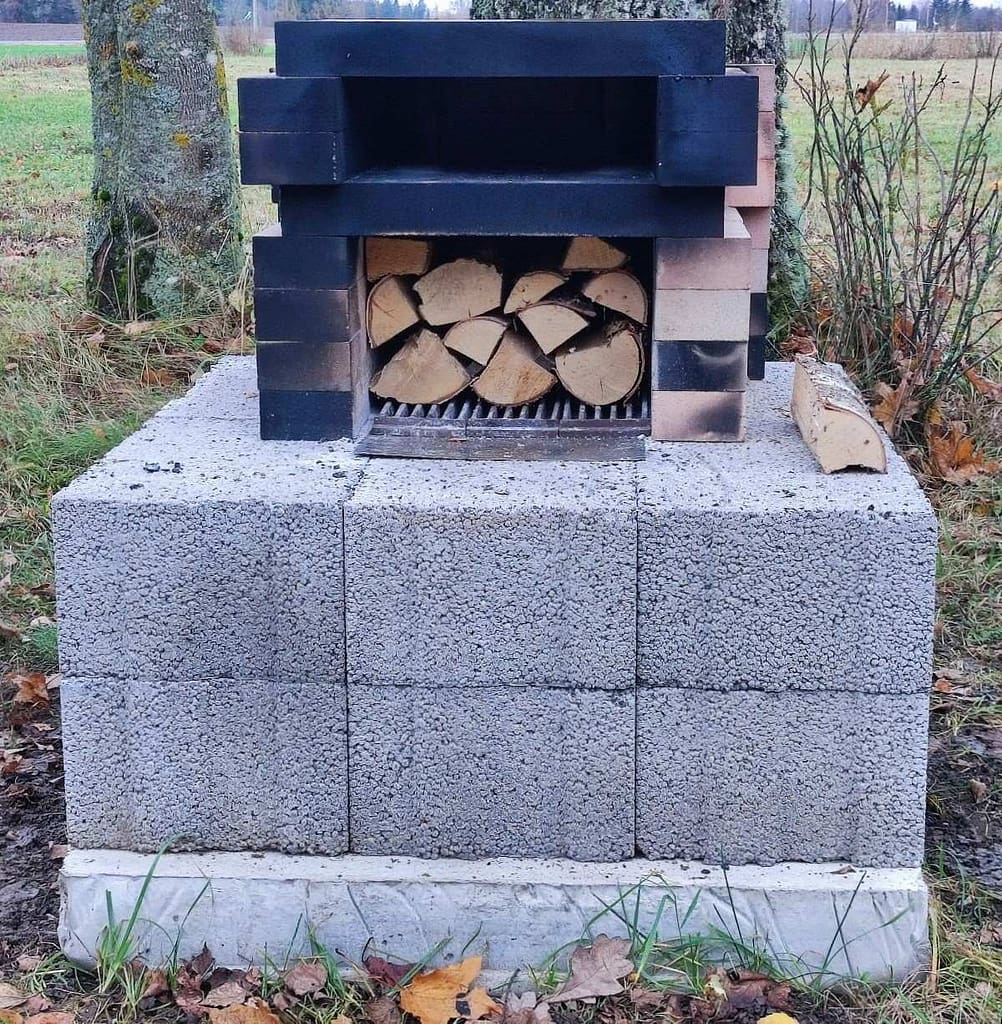
Below you will find a list of everything I used to build the pizza oven and a solid base for it. You can find “(optional)” written after some materials as they are dependent on how you will make the foundation under your pizza oven and if you want to protect whatever material is under the very hot fire. In the picture below, you can see the added stainless steel sheet and a fire grate to protect the construction blocks below and enable sufficient airflow under the fire.
Total summary of materials and tools required to build a pizza oven
Although you can find exact measurements here for the main components (for the oven and the base) these do not need to be exact. What matters most is that the foundation needs to be larger than the footprint of the pizza oven. Secondly, the thickness of the bricks and slabs needs to be the same. The actual number of slabs depends on the size you are able to get. With the measurements detailed below, you will need 4. If you can’t get roughly the same size pieces of fire brick slabs/pavers, you can read how to solve this in the building section of this blog post.
Building materials for the foundation under the pizza oven:
- Some old bricks or gravel as a base under the pizza oven (not necessary if construction blocks are used)
- 12 construction blocks (optional). Approximate measurements of a single construction block: 9.84 x 19.29 x 11.81 inches or in metric: 250 x 490 x 300 mm
- 8 bags of dry cement (optional)
- 4 straight blanks and wooden stakes for pouring cement (optional)
- Large sheet of plastic for pouring cement (optional)
Building materials for DIY wood fired pizza oven:
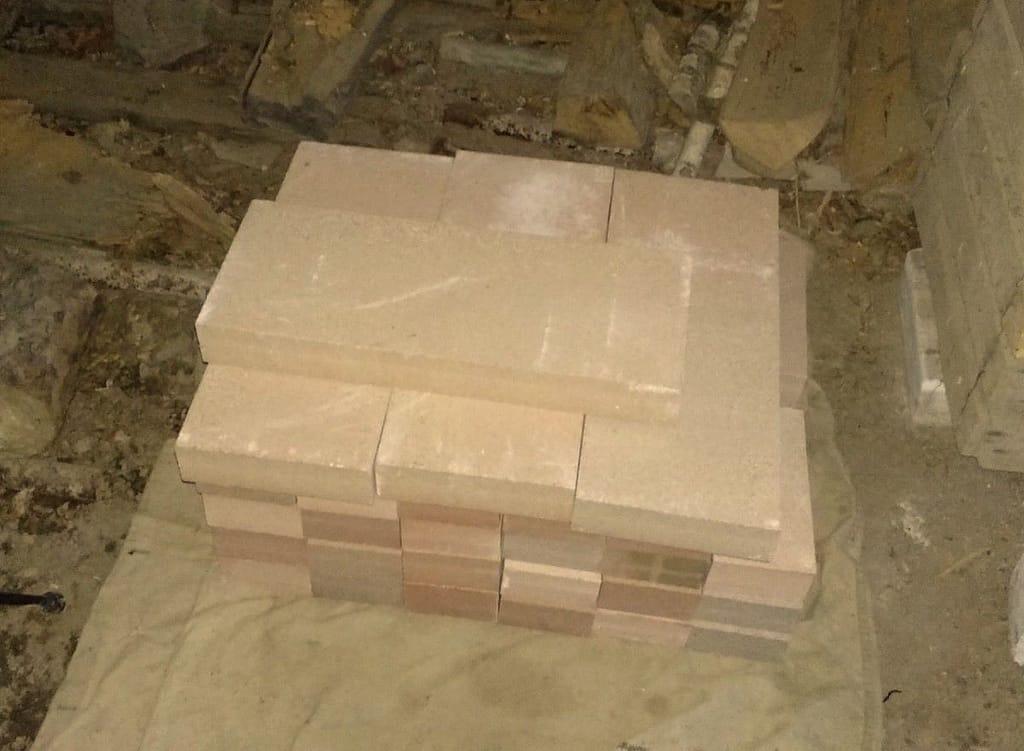
- 47 fire bricks. Measurements of a single brick: 8.66 x 4.33 x 2.36 inches or in metric: 220 x 110 x 60 mm
- 4 fire brick slabs/pavers. Measurements of a single slab: 19.69 x 7.87 x 2.36 inches or in metric 500 x 200 x 60 mm
- A bag of sand to help with levelling (optional)
- A stainless steel sheet for the base of the fire pit (optional)
- 3 piece fire grate placed on top of the metal sheet (optional)
Other tools:
- A level
- A measuring tape
What kind of bricks are suitable for building a pizza oven?
It’s highly recommended to use fire bricks for safety, performance and longevity of your pizza oven. Regarding safety, regular concrete may have some moisture stored inside. With very high temperatures the water inside concrete evaporates and expands. This can crack concrete or in a worst case scenario can cause it to even explode. Not a good picture if you’re thinking about a pizza night with family and friends. In the below video you can see how concrete can explode with enough heat.
Because I want to concentrate on making good pizza and not flying pieces of concrete and eye protection, I chose materials actually meant for fire and extreme temperatures. I also use good firewood (e.g. dried birch) to make a proper inferno in my oven. If ‘inferno’ does not spell it out for you: this fire burns hot. I don’t mess around with twigs that have questionable heating properties.
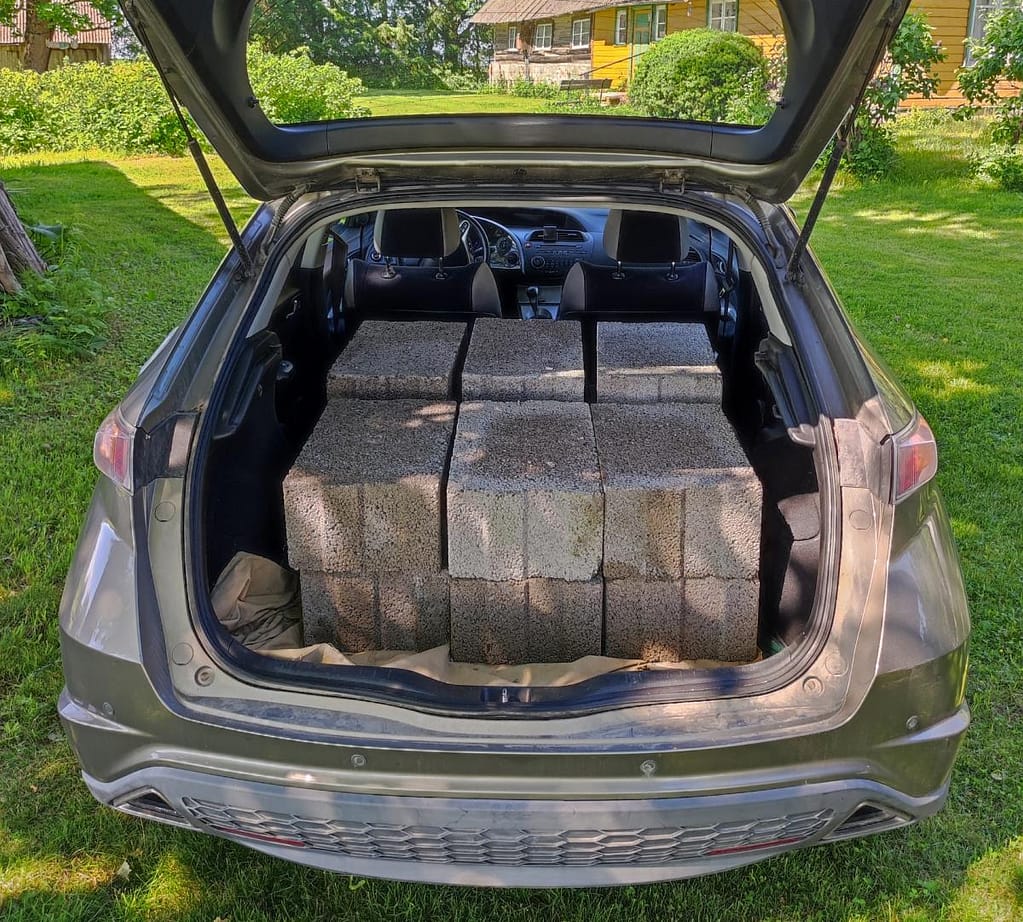
In the picture below you can see my 47 fire bricks and 4 slabs (also the same material) stored in my shed before constructing the oven. They were transported in the trunk of my trusty hatchback.
How to build a base for your outdoor DIY wood fired pizza oven? Here are three easy ways.
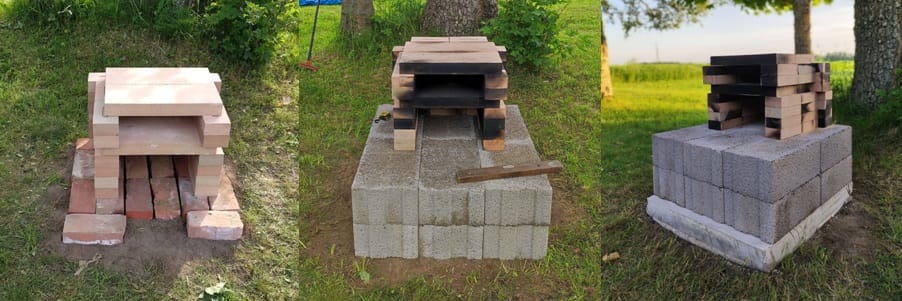
I have built my pizza oven three times. There was nothing wrong with any previous version. I just made simple upgrades that made a huge difference. Out of that I can present you three ways to go about building a base before you start building your pizza oven on top.
Old bricks, gravel or sand: easy but bad ergonomics
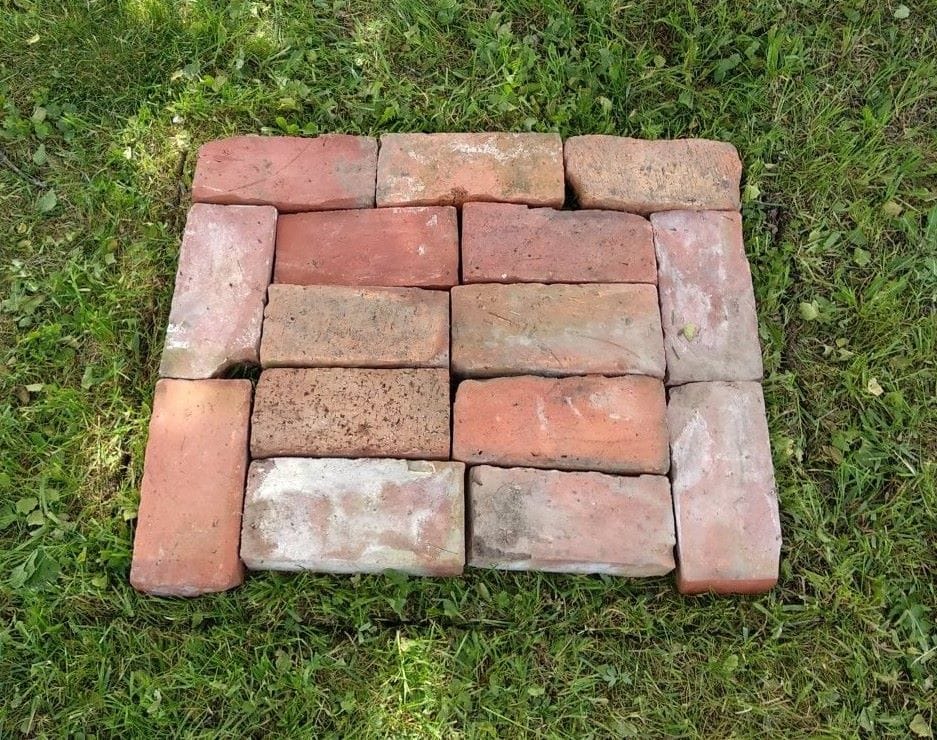
This was my version number one: old bricks that were laying around. The initial goal was to buy as little material as possible. Firebricks were a given of course but regarding everything else… I wanted to make due with what I had laying around. Luckily an old farmhouse has a lot to offer in that department. One thing that is definitely needed is a good level so you can have an even foundation upon which to lay the bricks. If it’s very crooked, there will be large gaps between the oven bricks and this might ruin the proper airflow throughout the oven.
To make a foundation for your pizza oven from old bricks (or gravel/sand), do the following:
- Lay the bricks down to get the idea of the size of the base of the foundation (see above picture)
- Mark the outer perimeter of the bricks with a shovel or something you can use to make a visible line. In the picture above there is a faint line but it was enough.
- Remove the bricks
- Use a shovel to remove the grass and some dirt. Do your best to make the ground as even as possible.
- Lay down the bricks again and use the loose dirt to raise some bricks or remove some dirt with your hand to get a brick lower. Use a level often to level the bricks and create a single even foundation.
Task nr. 5 is a bit annoying and I did not reach perfection when I did it. I settled with the “good enough, let’s see if it works” approach and it was enough.
You can easily substitute bricks with gravel, sand or both. This might be simpler as smaller particles are easier to level. Sand especially, gets everywhere. Using gravel or sand you might not need to even dig out the ground.
There is however one big problem with this approach, whether you are using bricks, gravel or sand. You have to bend waaay down or squat in order to insert a pizza in the oven, watch it cook, turn it and do everything that is needed for a great pizza. To make matters worse, you may need to get even lower to start the fire and adjust the fire from time to time. Just thinking about it makes my knees hurt. Luckily there’s an easy way to raise the oven from the ground.
Construction blocks: very easy and better ergonomics
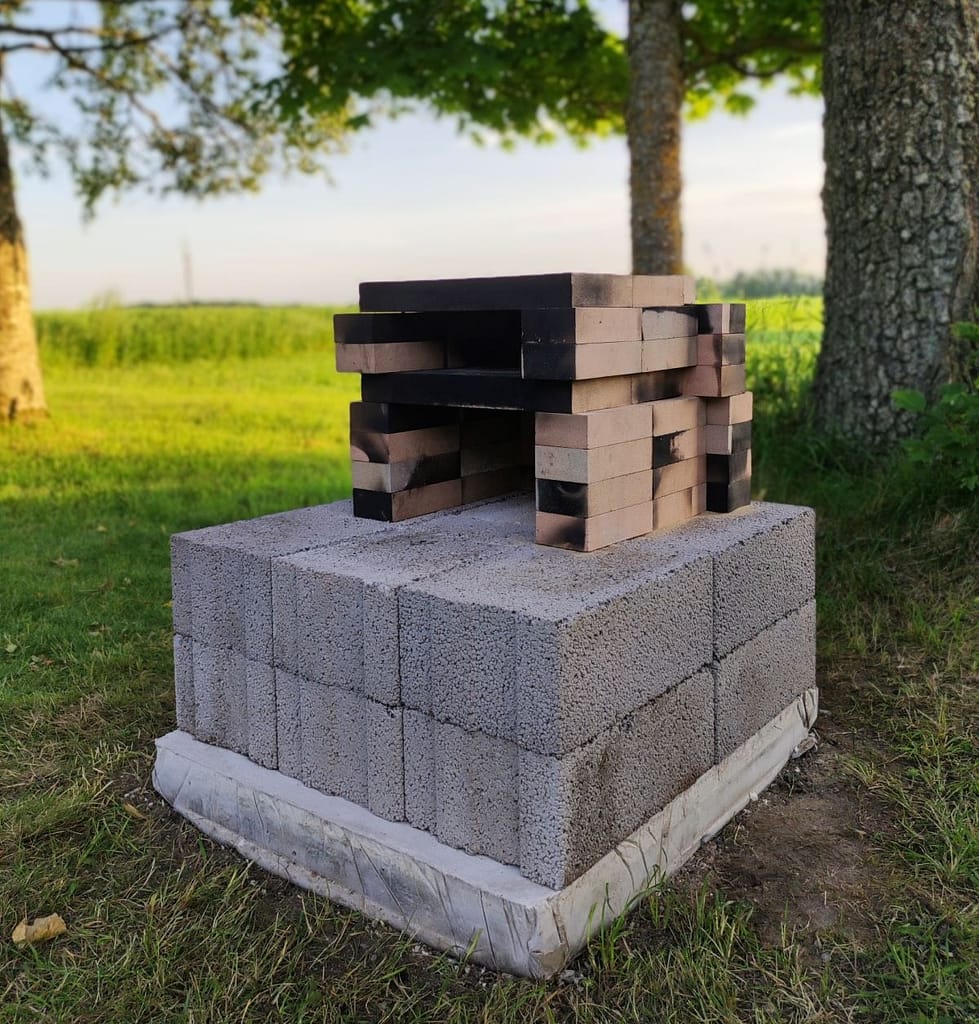
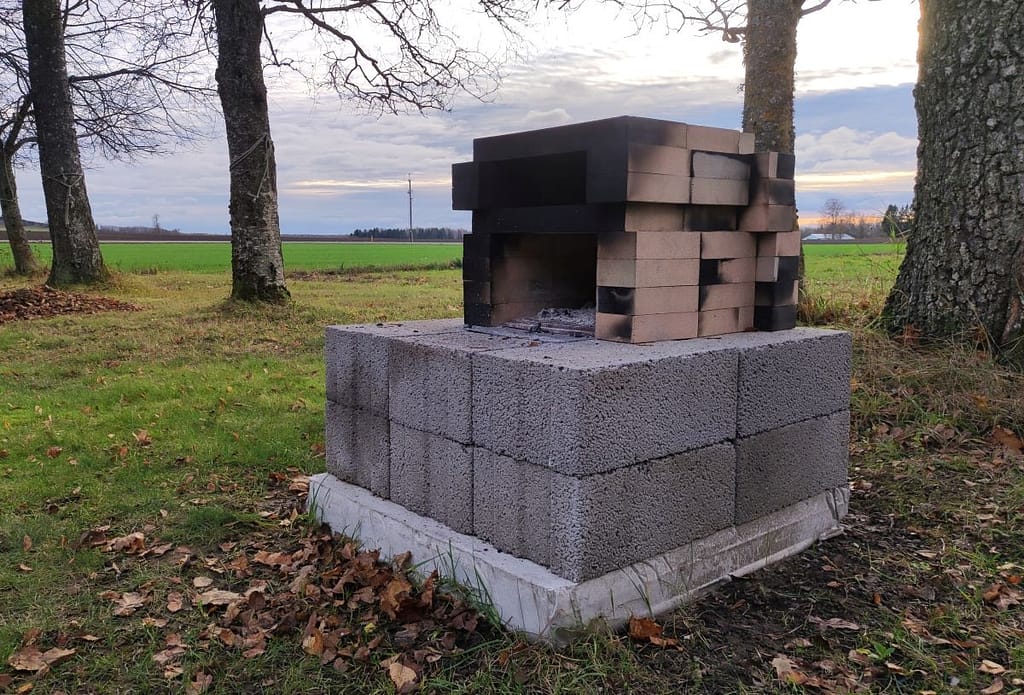
The second and a way better method to build the foundation is to use construction blocks. This idea dawned on me when I uncovered my outdoor pizza oven after a cold, hard and snowy winter (picture below was taken later in springtime). The oven looked a bit sad and the fire stones had moved, creating gaps in the walls of the pizza oven and other places where they shouldn’t be. This was likely because some of the foundation bricks had broken and some had shifted in place due to harsh, changing weather conditions.
As I still wanted to make pizzas that day, I fired up the ol’ oven (it was already 10 months old by then). It worked, but not as well as last summer. I gathered it was time for an upgrade. Either way I had to lay the bricks again (with no gaps). Might as well make a better version. The oven 2.0.
Here’s how to build a base for your pizza oven from construction blocks:
- You will need construction blocks (recommended quantity: 12; measurements of a single block: 9.84 x 19.29 x 11.81 inches or in metric: 250 x 490 x 300 mm)
The quantity and measurements are recommended approximates. Basically anything will work as long as the constructed foundation is larger than the pizza oven itself. The larger the blocks the less of a hassle it will be to construct and get all the blocks level regarding each other. While I had two stories (6+6 blocks), you can make it a three storied foundation with 18 blocks (6+6+6) or why not go crazy and have four stories with 24 blocks (6+6+6+6). You get the picture.
- Even the ground where you’re going to lay the construction blocks. You can also use gravel or sand under the construction blocks.
The ground might not need any work. The lazy way is to lay six blocks on the ground and use a level to find out which block to lift or dig a bit lower into the ground. This was actually surprisingly easy in my case, although you do need to flex your muscles a bit to lift the blocks… possibly several times… tell yourself it’s fun. You can justify eating way more pizza afterwards.
- Lay however many stories you want. I stuck with just another six blocks on top. If you’re going for the skies, use the level from time to time to check that everything is even steven.
- I have nothing else to add here. Easy… or should I say… Lazy?
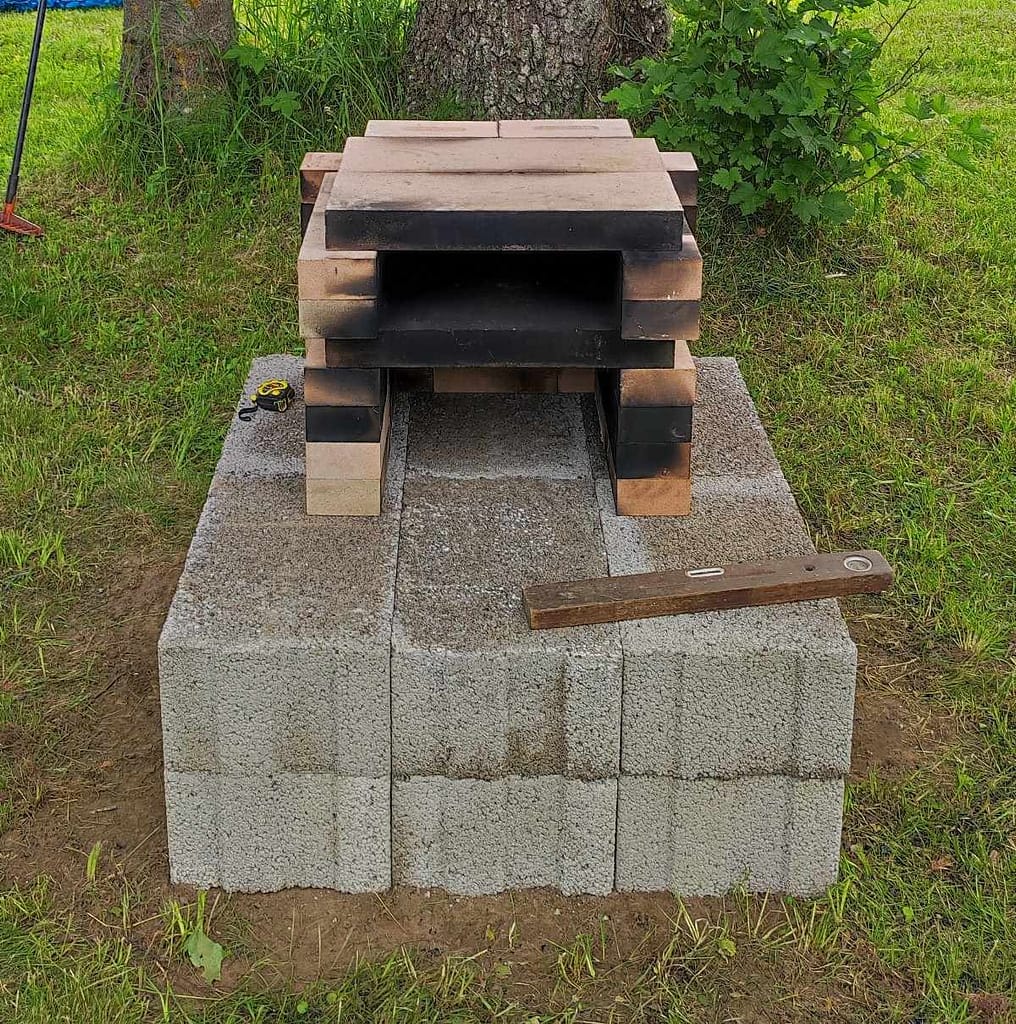
The above picture demonstrates a 6 + 6 construction block foundation. It’s just laid on dirt. As you can see the foundation is a lot larger than the oven itself. This was intentional as it gives some extra space in front of the oven. In my opinion a large foundation also looks more aesthetically pleasing.
Although good quality blocks should withstand cold climate and moisture it would still be good to have some ground clearance to avoid water pooling around the blocks. This is why I decided to pour concrete to make a truly solid foundation. Read on to find out how.
Poured concrete under construction blocks: the most recommended option (especially for winter)
The best method to create a truly solid, monolithic foundation for your outdoor pizza oven is to pour concrete and then lay construction blocks on top. This again lifts the oven even more, thus improves ergonomics and furthermore creates some ground clearance for the construction blocks so there wouldn’t be any water pooling around your blocks. Also, with climates that have rough winter periods with fluctuating temperatures, the ground might play throughout the winter. If anything moves, it moves together with the concrete foundation and the pizza oven stays intact.
Laying cement is a bit more challenging work than simply putting building blocks on top of each other, but hey, if I could do it, so can you! To be honest, my father, who has construction experience, helped me out here. More like he told me what to do and I obliged. I believe I could have done it by myself just as well or so I like to think.
Here’s a good and simple DIY video of pouring a small concrete slab in you backyard.
Here’s a quick overview of how we (me and my father) did it:
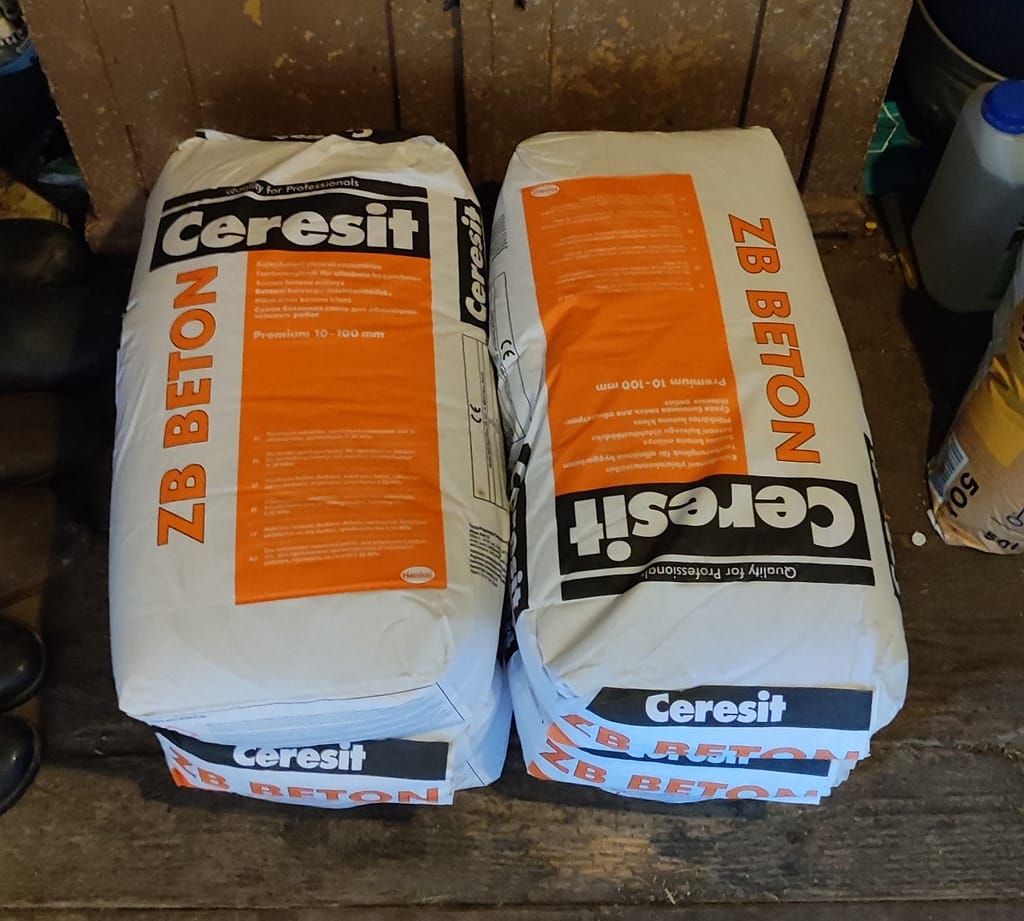
- Get about 8 bags of regular dry cement.
- Make a rectangular frame from straight blanks. The blanks need to be the same height to make achieving an even surface easier, although gravitation helps here also, resulting in a level surface.
- Put the frame on the ground and use extra pieces of wood to raise the frame where needed so the frame would be levelled.
- Secure the frame by hammering some wooden stakes along all four sides of the frame
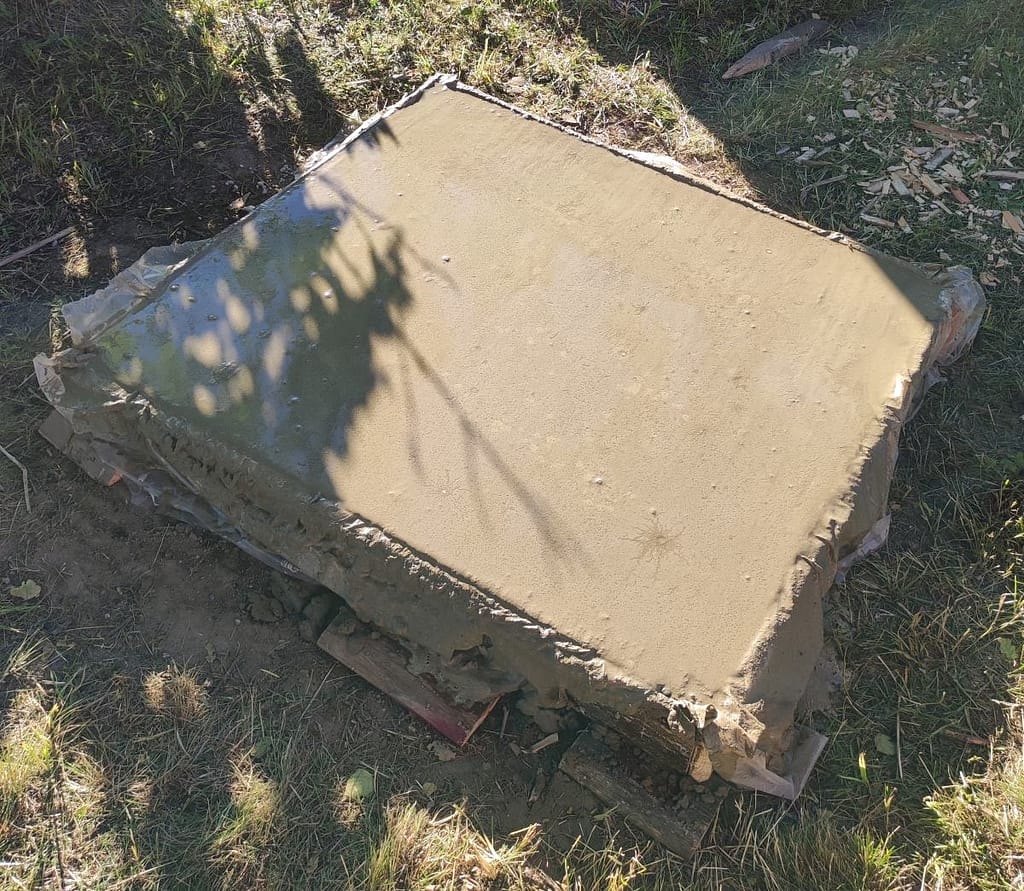
- Insert a plastic sheet inside the frame. This helps keep the liquid concrete in place and prevent it from running out of the frame and through gaps.
- Reinforce the concrete by finding some old metal (or use proper reinforcement steel) to put in the frame before pouring cement. In the picture below, I used a metal headboard of an old bed plus some other pieces of metal wired together. This makes the eventual concrete block a lot stronger and resilient.
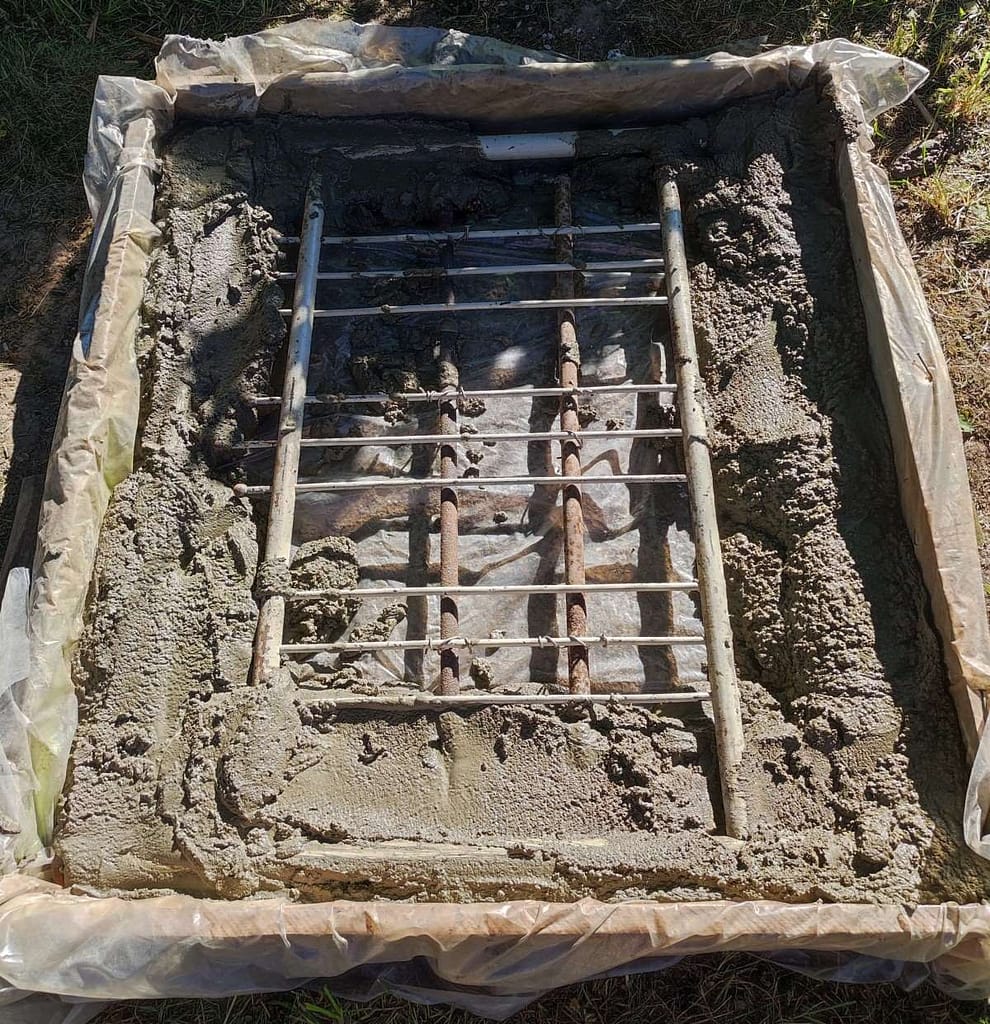
- Start mixing the cement one bag at a time. At the beginning, make a bit thicker mix, which will be used to secure the reinforcement in place (see the picture above). After that, make it a bit thinner. Keep mixing concrete and fill the rest of the frame.
- When the frame is filled with cement, even it out by running a straight blank over the frame back and forth (can also be seen in the video above at 4:24) to get a smooth surface.
- Let the cement cure for about a week (it takes time) and spray it with a bucket worth of water a day.
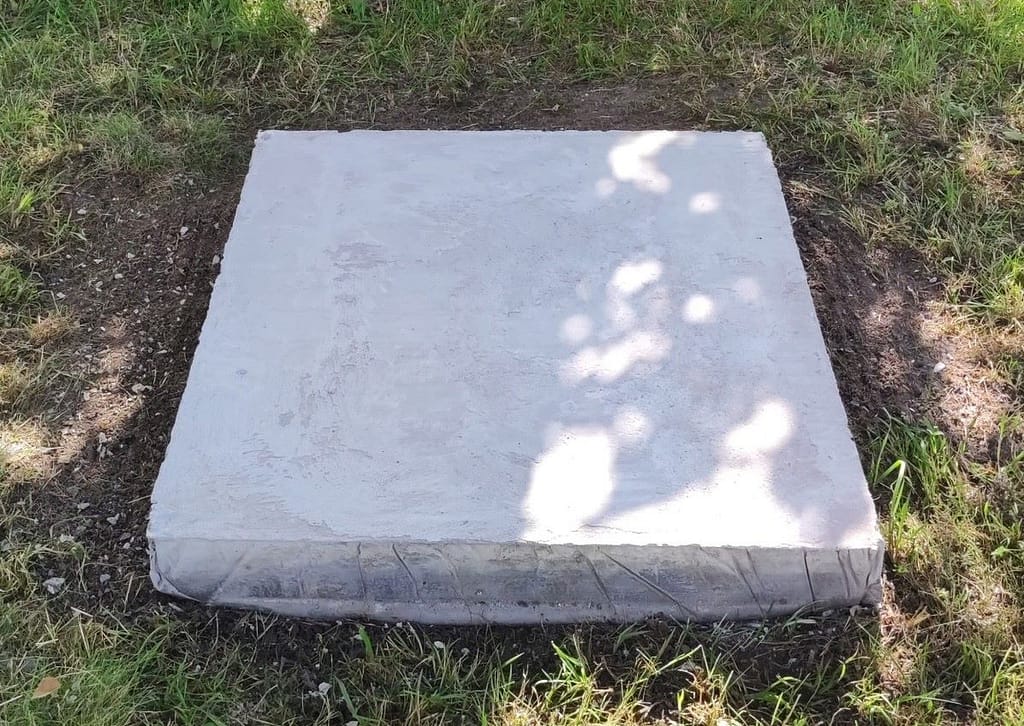
The end result is well worth it when the cement is finally dry and you can remove the wooden frame. You can also cut the plastic sheet as close to the bottom edge as possible. The picture below demonstrates the end result, a freshly minted concrete block. Now you can lay the construction blocks on top.
How to construct a pizza oven from bricks and slabs the easiest way possible? A step by step guide.
I discovered my method of constructing the pizza oven by accident and out of necessity. I purchased the amount of bricks based on a video my friend sent me. It was a ChefsSteps video on how to build a pizza oven. It said I needed 47 bricks. I didn’t think twice about how the actual measurements of the bricks will play a role in the construction. When I finally started to lay bricks, I was in trouble. To my great surprise I was out of bricks at one point with only half of my pizza oven built. Now, how did that happen!? The picture below demonstrates my failed attempt.
I had used all of the 47 small bricks and I only had half an oven. It could have possibly functioned as an outdoor stove but not so good for making a pizza. There was no way I was going to order more fire bricks (I wanted pizza NOW!). I had to get creative and make due with less bricks. I deconstructed what I had built and started over with a far more simplistic approach. Now I swear by it.
Here’s the easiest step by step guide you’ll ever find on how to build a brick pizza oven:
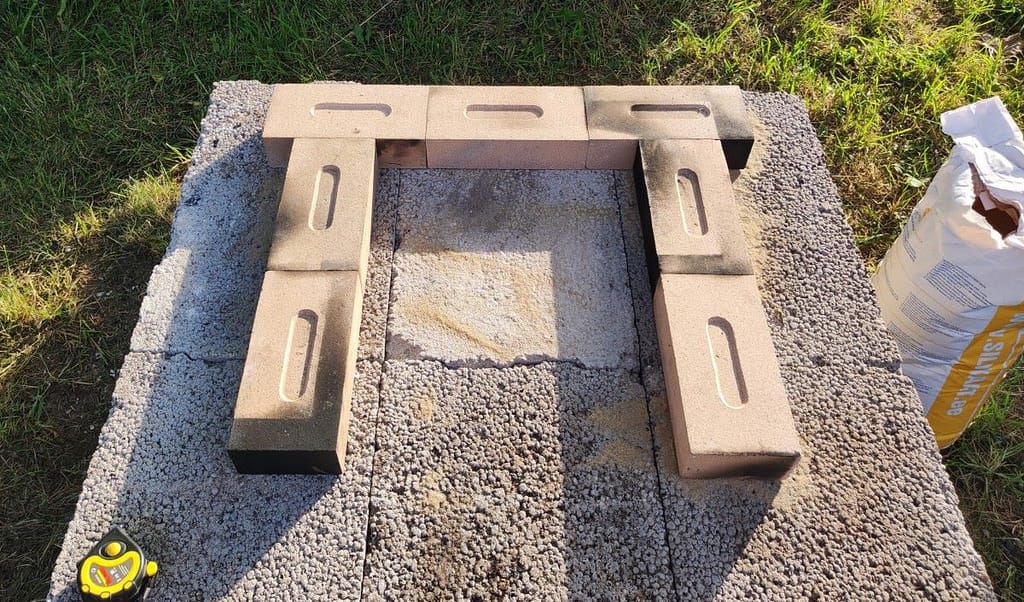
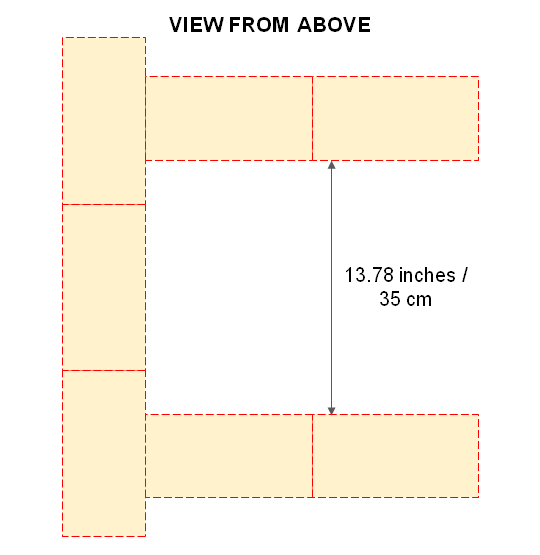
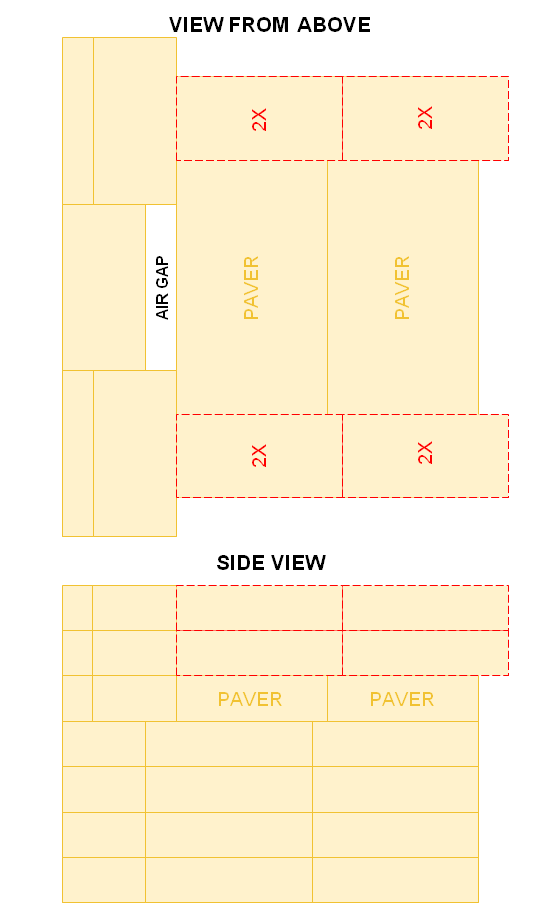
Step 1. Lay the bottom bricks as in the picture below. After this you will have used 7 of the 47 bricks. Although the width (13.78 inches / 35 cm) on the drawing below is given as an exact measurement, you can actually make it wider or narrower as you please or depending on how large your pavers (larger fire brick slabs) are.
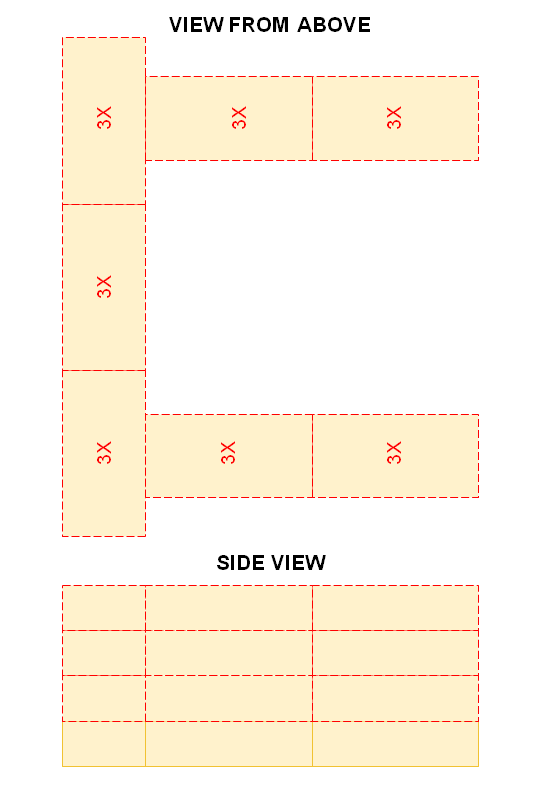
Step 2. Lay 3 more bricks on each brick as indicated below. As a result a 4 storied foundation forms and you will have used 28 of the 47 bricks. The red dashed line indicates where new bricks need to be laid.
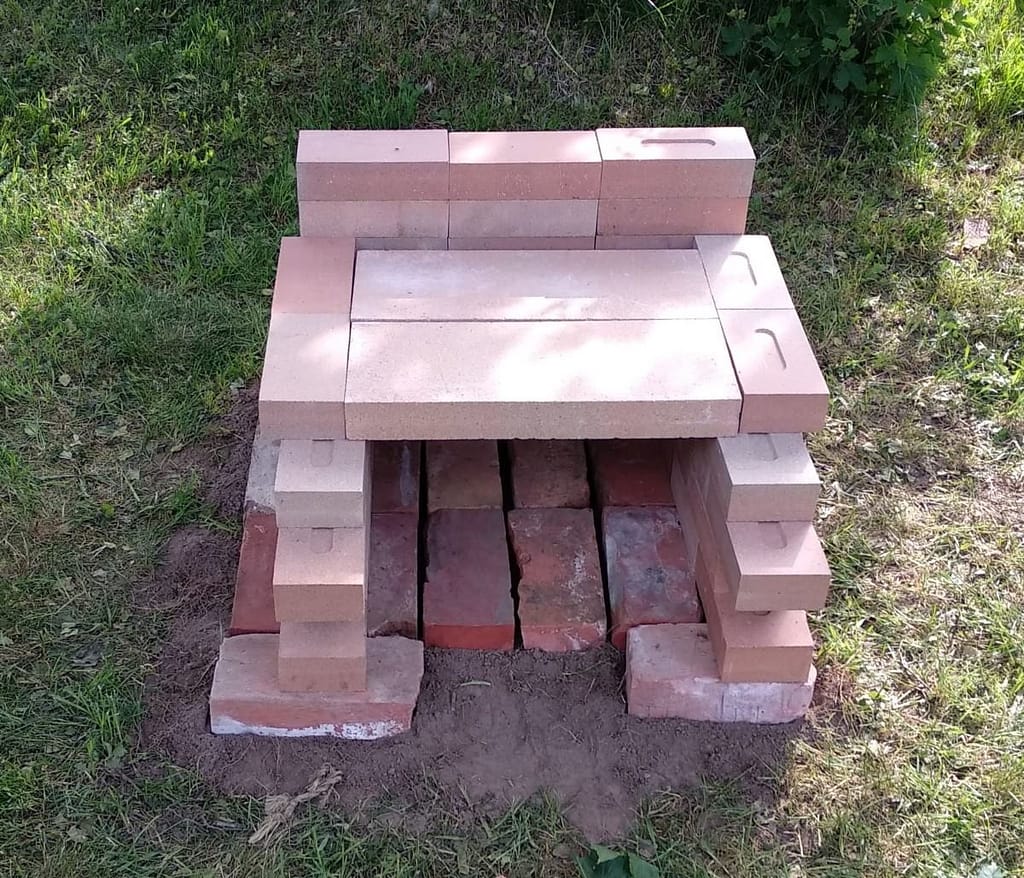
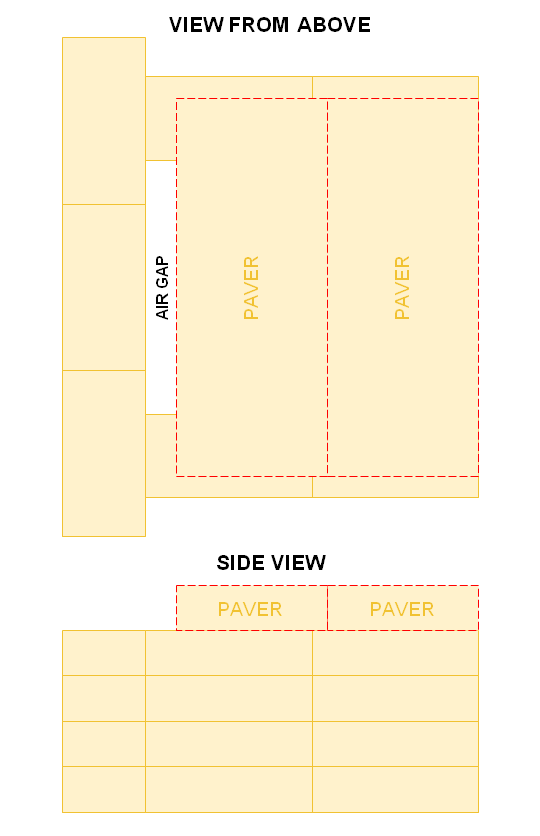
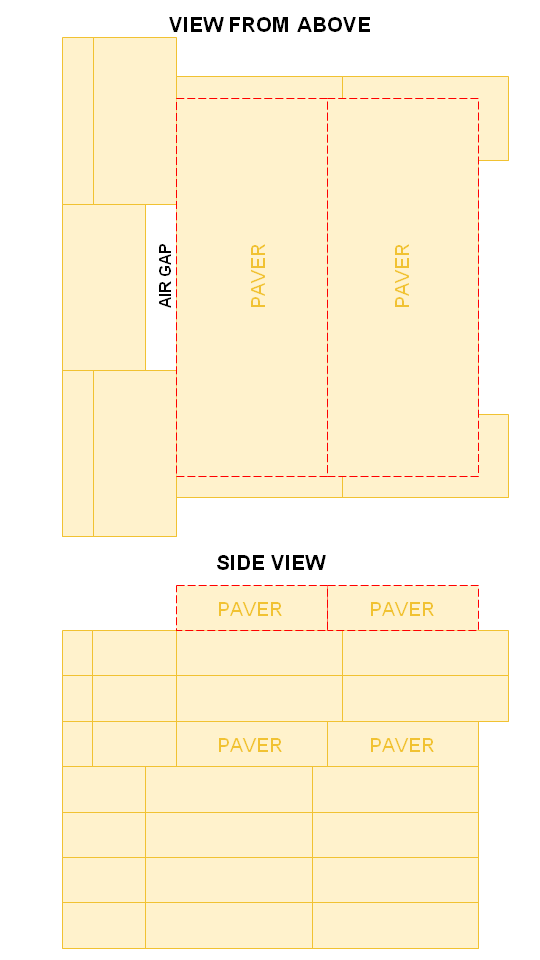
Step 3. Now lay the fire brick slabs / pavers (labelled “PAVER” on the drawing) like on the picture below so that an air gap forms where labelled. After this you will have used 2 of the 4 pavers / fire brick slabs.
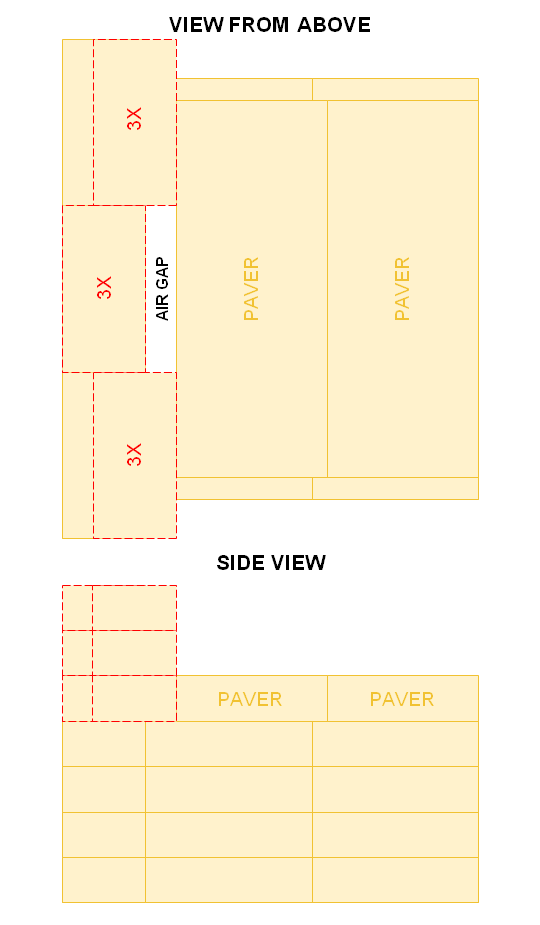
Step 4. Next, stack three bricks on top of each other where indicated (marked with a red dashed line). This is a total of 9 bricks, 3 in each column. As a result the air gap gets a bit smaller. After this you will have used 37 of the 47 bricks.
Step 5. Add four bricks on top of the pavers on each side (a total of 8 bricks) as indicated below with a red dashed line. After this you will have used 45 of the 47 bricks.
Step 6. Add the remaining two pavers / slabs, labelled “PAVER” as indicated below with a red dashed line. You will notice (from the side view) that the pavers are positioned the same way as the first ones. After this you will have used all of your pavers / fire brick slabs (4 out of 4).
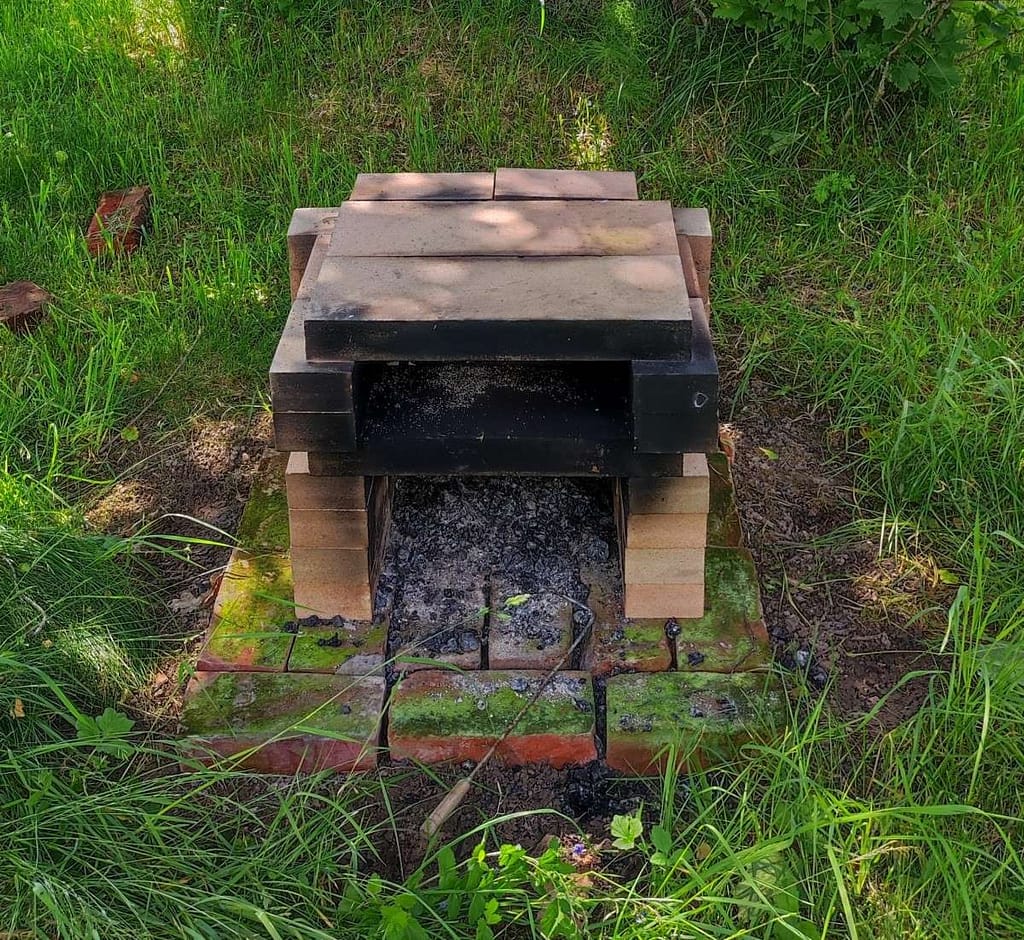
Step 7. Add the remaining 2 bricks as indicated below to close off the air gap. After this you will have used all of your fire bricks ( 47 of 47) and your wood fired pizza oven is finished and ready for action.
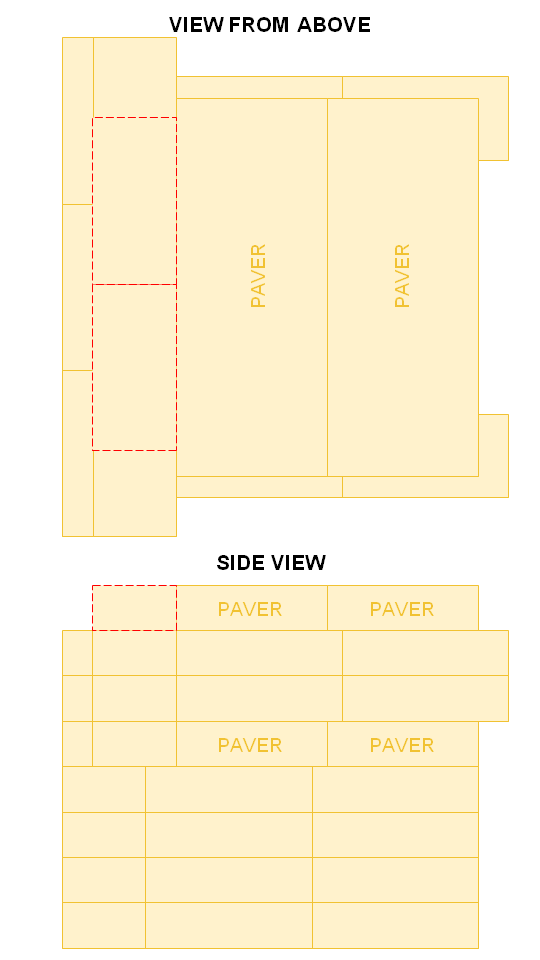
After you have completed all the steps described, you should now have a functioning pizza oven, given you had a solid foundation before you started laying the bricks. In the picture below you can see what the construction should look like if the instructions were followed.
How to properly use your outdoor pizza oven to get restaurant quality, Neapolitan style pizza?
Now that the oven is built it is also important to briefly cover the topic of using the outdoor pizza oven. I’ve seen too many posts and videos where people go through the effort of building a wood fired pizza oven in their backyard and then fail to grasp the point of it.
They throw in some twigs and once they get a small fire going they insert a microwave pizza on a paper plate or tinfoil into the oven to basically just heat it up. Then they show off with a “cooked” pizza and praise the “smoky” flavour which is actually a result of excess smoke discolouring the cheese on top and making everything bitter tasting. Have you seen a smoke painted pizza in an Italian restaurant where they use a wood fired oven? No. That’s because it would ruin the taste.
The goal of the wood fired pizza oven is to make ridiculously good pizzas instead of warming up refrigerated ones. You need good pizza dough to make good pizzas. Here’s a simple Neapolitan pizza dough calculator and an easy recipe to make a proper pizza dough.
Here’s how to use your pizza oven the correct way:
1. Use quality firewood (e.g. dried birch) and build a proper fire
2. Burn the wood until it burns fairly clean (little or no white smoke) and the oven temperature rises above 800°F / 400°C

3. You are now ready to make awesome pizzas
A couple of pro tips for using the pizza oven
Get a lengthy pizza peel
Get a pizza peel with a nice lengthy handle. The oven will get very hot, above 800°F or about 400°C. You’ll want to keep a distance when inserting a pizza into your oven, turning it or taking it out. It might not seem like a big problem to solve but actually there will be a lot of situations when you would be wishing for a longer handle, trust me.
Use the ceiling of the fire pit
When the bottom of your pizza is done but the top seems to require a bit extra then the ceiling of the fire pit will do the trick. Yes, the ceiling above the roaring flames. My friend came up with it, when we were having a pizza gettogether. It literally takes a couple of seconds and you get a perfect result. This is especially handy when the fire has cooled down a bit and you don’t want to throw in any fresh logs anymore.