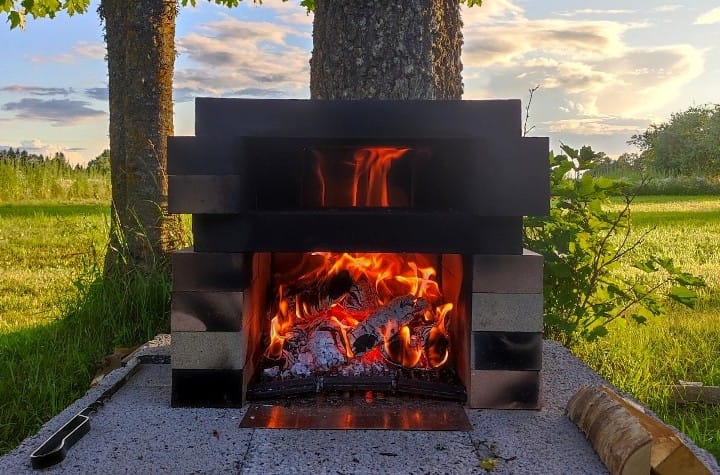
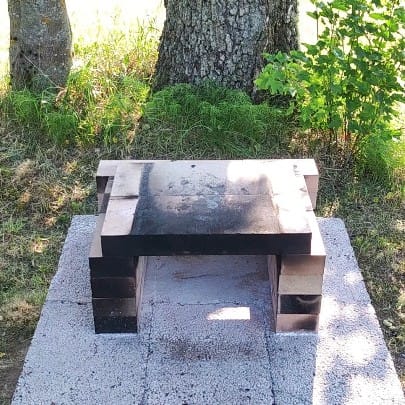
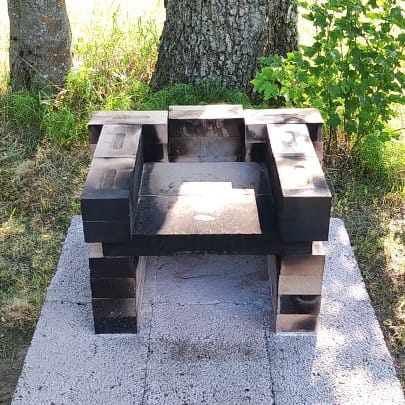
To build an outdoor pizza oven, follow the simple steps in this post. You will be rewarded with a durable, high-performance pizza oven that can produce amazing Neapolitan style pizza and other dishes.
In this post you will find an easy step by step (7 steps) plan to easily construct your own DIY wood fired pizza oven. You’ll find drawings and real life pictures of all the steps as well as a short video.
What materials are needed to build a DIY brick pizza oven?
- 47 fire bricks. Measurements of a single fire brick: 8.66 x 4.33 x 2.36 inches or in metric: 220 x 110 x 60 mm.
- 4 fire brick slabs/pavers. Measurements of a single slab: 19.69 x 7.87 x 2.36 inches or in metric 500 x 200 x 60 mm
- Some gravel, old bricks, sand or construction blocks to create a level foundation for your outdoor pizza oven
- A bag of sand to help with levelling (optional)
- A stainless steel sheet for the base of the fire pit (optional)
- 3 piece fire grate placed on top of the metal sheet (optional)
Tools needed:
- A good level
- A measuring tape
The measurements of the fire bricks and fire brick slabs do not need to be exactly the same as detailed above. That said, the bricks and slabs need to have the same thickness. The actual number of slabs / pavers depends on the size you are able to get. With the measurements mentioned above, 4 is needed.
Constructing the DIY brick pizza oven from bricks and slabs: a step by step guide
Below you’ll find a video and detailed instructions with pictures on the 7 steps to build your pizza oven. This method of building a DIY wood fired pizza oven is a simplified and more durable version of the oven as shown on ChefSteps.
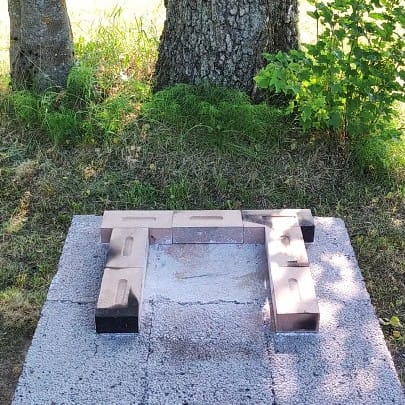
Preparation: make a solid and level base for the brick oven
Make a base from old bricks, gravel or sand so you will have a level ground for laying bricks. Alternatively, use construction blocks as a base with better ergonomics.
You can read everything there is to know about building a good base for your DIY pizza oven in this separate post: How to build a good base for your DIY wood fired pizza oven
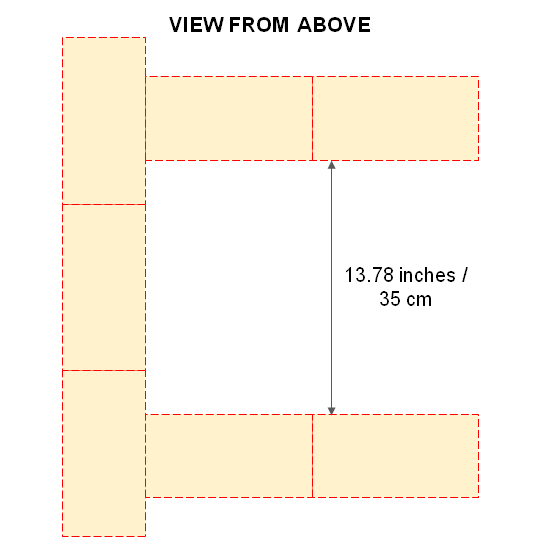
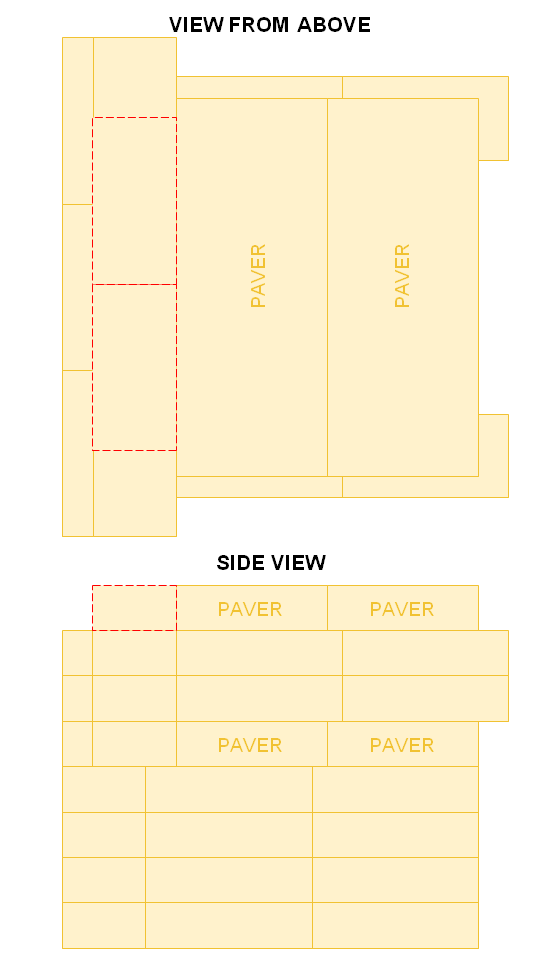
Step 1: lay the first 7 bricks
Lay the bottom bricks as in the picture below. After this you will have used 7 of the 47 bricks. Although the width (13.78 inches / 35 cm) on the drawing below is given as an exact measurement, you can actually make it wider or narrower as you please or depending on how large your pavers (larger fire brick slabs) are. This also defines the pizza size you will be able to cook.
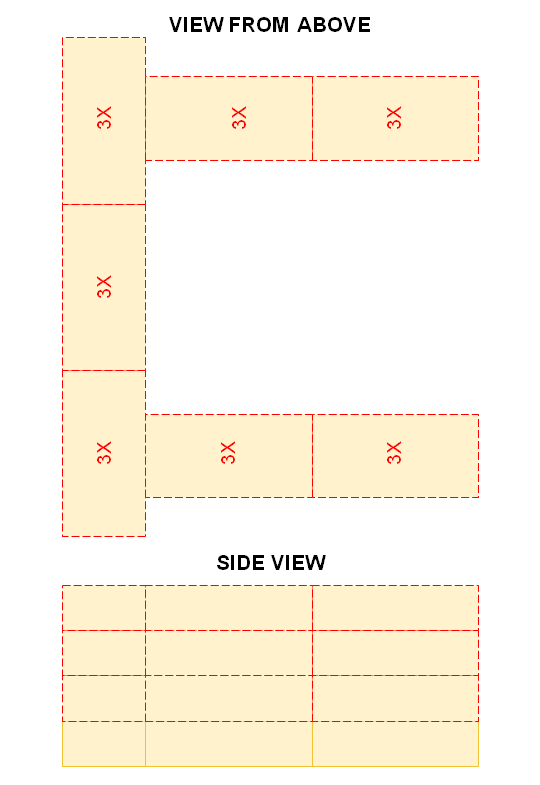
Step 2: add 21 bricks on top
Lay 3 more bricks on each brick as indicated below. As a result a 4 storied foundation forms and you will have used 28 of the 47 bricks. The red dashed line indicates where new bricks need to be laid.

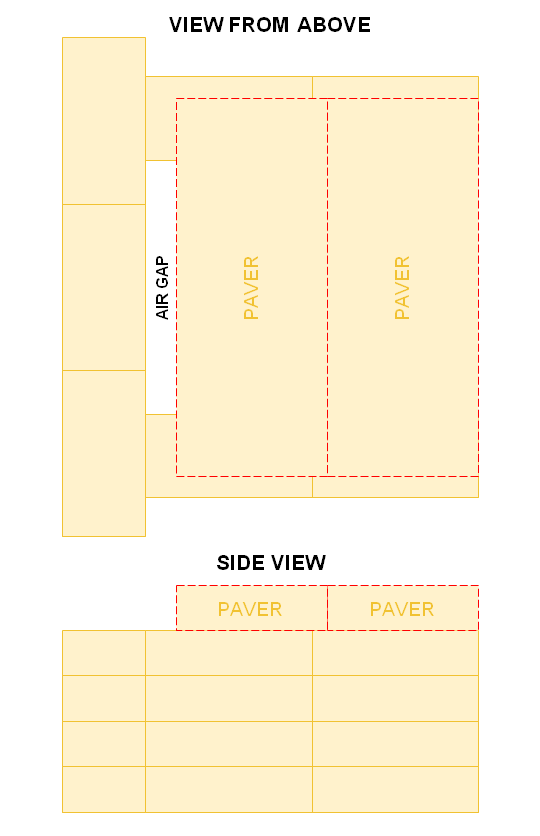
Step 3: set the first larger slabs / pavers
Now lay the fire brick slabs / pavers (labelled “PAVER” on the drawing) like on the picture below so that an air gap forms where labelled. After this you will have used 2 of the 4 pavers / fire brick slabs.
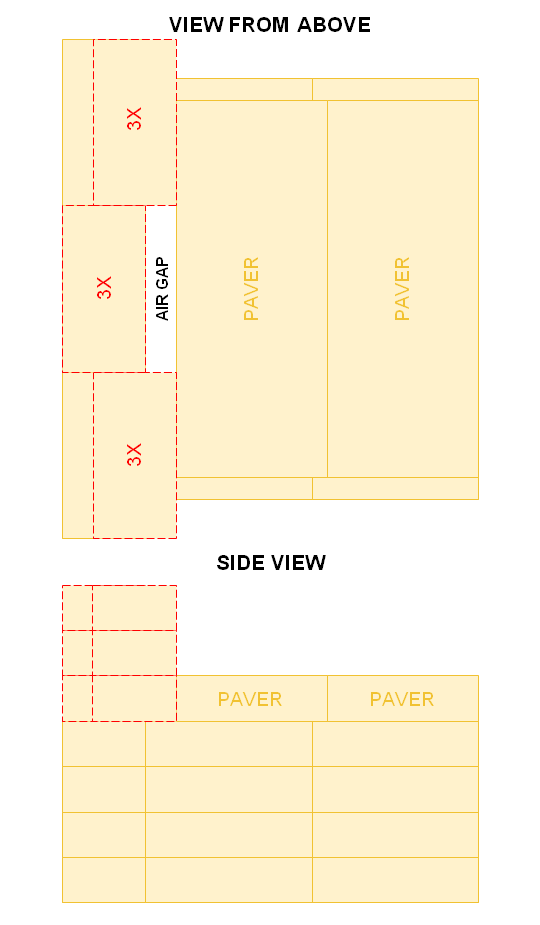
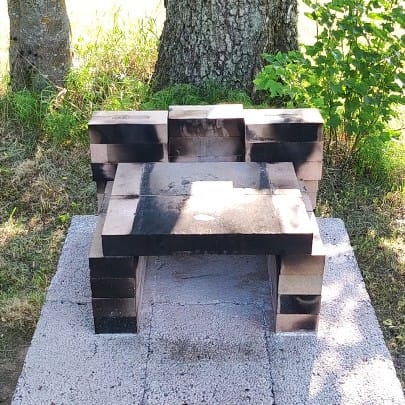
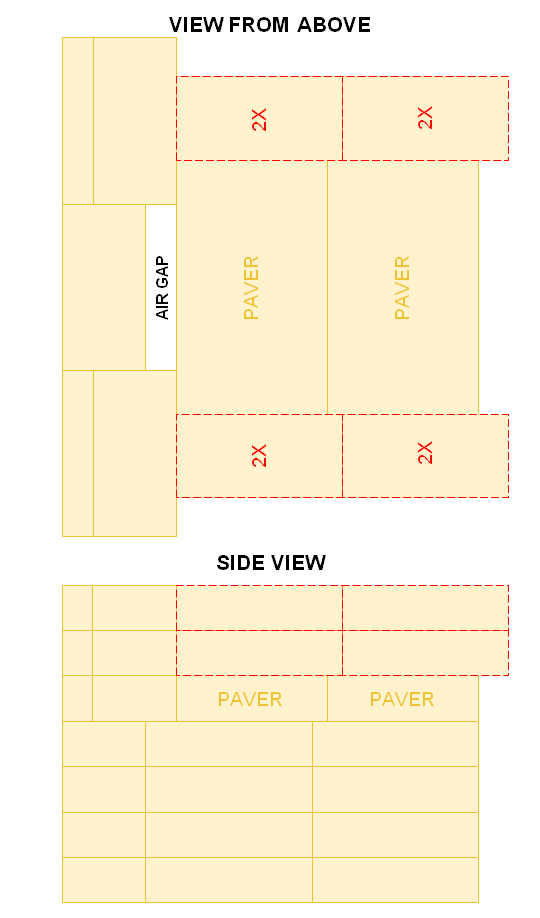
Step 4: add 9 more bricks
Next, stack three bricks on top of each other where indicated (marked with a red dashed line). This is a total of 9 bricks, 3 in each column. As a result the air gap gets a bit smaller. After this you will have used 37 of the 47 bricks.
Step 5: add 8 bricks on top of the slabs / pavers
Add four bricks on top of the pavers on each side (a total of 8 bricks) as indicated below with a red dashed line. After this you will have used 45 of the 47 bricks.
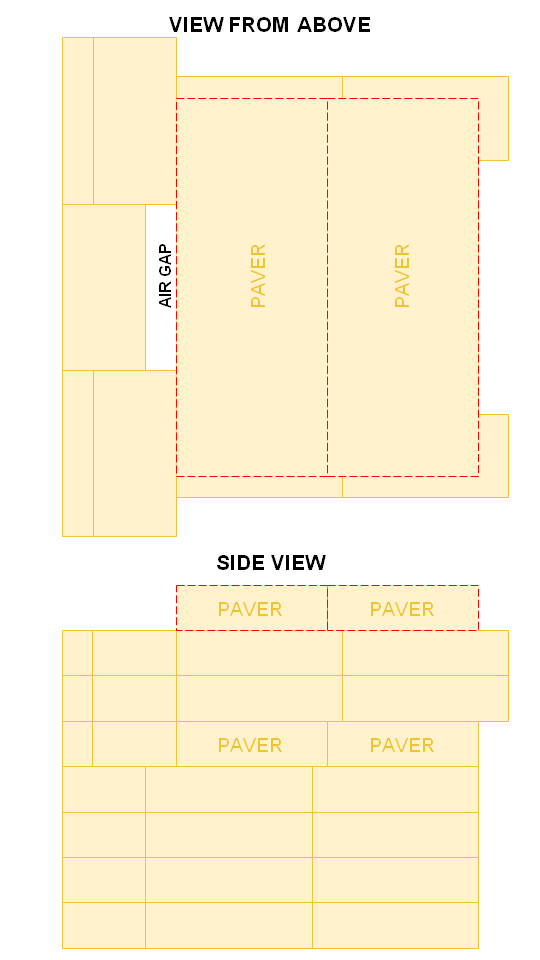
Step 6: add the remaining two slabs / pavers
Add the remaining two pavers / slabs, labelled “PAVER” as indicated below with a red dashed line. You will notice (from the side view) that the pavers are positioned the same way as the first ones. After this you will have used all of your pavers / fire brick slabs (4 out of 4).
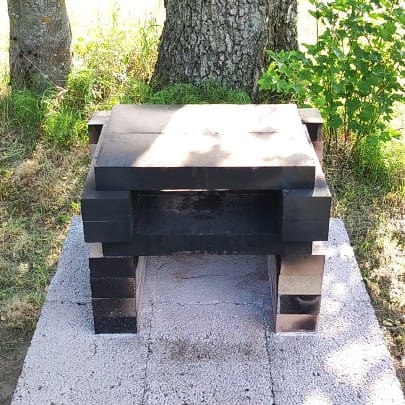
Step 7: lay the final 2 bricks
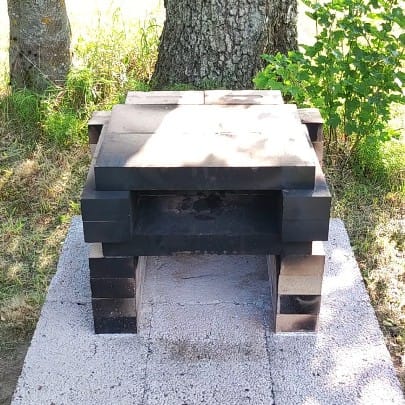
Add the remaining 2 bricks as indicated below to close off the air gap. After this you will have used all of your fire bricks ( 47 of 47) and your wood fired pizza oven is finished and ready for action.
Optional additions: fire grate and a piece of sheet metal
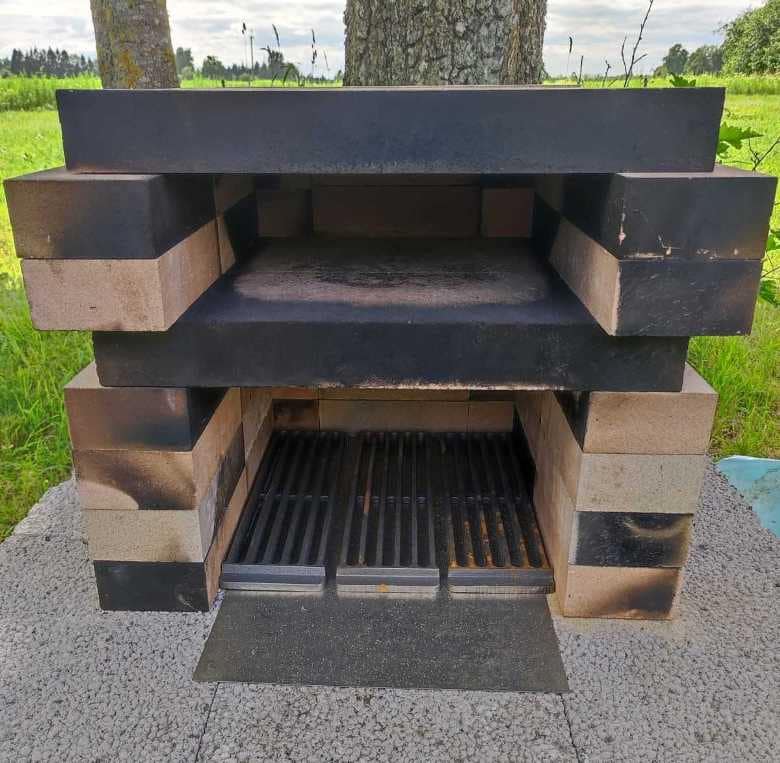
You can add a piece of sheet metal to the bottom on the fire pit and a fire grate on top of it. These additions will do two things.
The sheet metal and fire grate both protect the material below. In this case there are construction blocks below that start to deteriorate with high usage under very high heat.
Secondly the fire grate improves the airflow significantly: more fire = higher temp. = better pizza. Also it is very easy to clean the ashes and remaining coals from the oven. Most of the coal will be on top of the fire grate and the metal sheet acts as a platter to easily take out the remaining ashes.